Monday, 31 December 2012

Memo Board


I’ve been itching to get back into the crafting zone so I set my sights on creating a memo board for my crafting conservatory.  I thought it would be a great way to set 2013 off to a good crafting start as I could pin up project idea lists, inspirational pictures, patterns etc.

I saw a show just before Christmas of one of Kirstie Allsopp’s Home Made Home type programmes and she made a board on there which reminded me that I’d always wanted to give it a go.

Inevitably a shopping trip was the way forward to get things going.  On my list was…

1) Deep edged canvas (mine was 20”x16”)

2) Wadding/Batting

3) Material (as pretty as possible)

4) Ribbons (more than 3m as I found out later…)

5) Staple Gun (good investment…I asked the guy in the shop for a staple gun and he asked me what was I going to use it for…I said fabric…he looked at me weirdly…I didn’t think he looked like he wanted to know about my project so I re-thought and said walls…that, to him, sounded equally as bizarre!)

I did look at a few tutorials on-line but just decided to free-style in the end.

Staple Gun ActionI wrapped the canvas in wadding and pretty fabric and staple gunned into place.  Staple gunning I feel is more suitable for use by a man…my man obliged, and I think he felt using the gun outweighed the floral fabric and ribbons in the masculinity steaks…

hospital corners


Pretty Floral


Hospital corners on the wadding and beautiful floral fabric.  I remembered to iron my fabric and pulled really taught to make it look good.


3m never enough...

Now 3m of ribbon I thought would have sufficed… Apparently not…all but one last strip on the bottom right!  I was so excited about completing this project I couldn’t wait to go and buy more ribbon.  I searched high and low around the house to see if I could salvage any to match…not a thing.  I couldn’t just leave it and wait for more ribbon to be bought!

So I started trying out various ribbon combinations until I settled on one that I thought would do.   I don’t think it was too much of a compromise and I think it looked good in the end.  I made self covered buttons (fiddly little blighters…) and sewed them into the inter crossing points to secure. 

self covered buttons

And there it is…  A beautiful memo board for all of my lists and inspirations to be pinned.  My man has the job of hanging it up tomorrow, on New Years Day.  A fantastic start to 2013!

P1010958

I am now going to wait up to dutifully watch the New Years fireworks on the Telly Box before retiring to bed.  I will wish you all a Happy New Year and I wish you all health, wealth and happiness in 2013!

Love from me and my little man x

PS…he’s started to walk….!

Testing, testing, 1 2 3…

As the title reads I am testing! I’m testing the new live writer application on my new (extremely pretty in peacock blue!) laptop! Are we live?!

Sunday, 30 December 2012

Christmas Spoils


Where did Christmas go...?!  

We travelled back home yesterday after spending Christmas with the in-laws.  We had a great time celebrating Christmas and Birthdays but I admit to feeling an overwhelming sense of comfort being back in my own home.  

After Christmas has been and gone, I just want the tree down as soon as possible in a bid to greet the New Year in on a clean slate.  I get that hurriedly rushed feeling that everything must be clean so we can relax and be at ease (...one of my annoying quirks is not being able to relax in a messy  room/house...so difficult now with a one year old around!  I don’t mind cleaning...but sometimes it feels like a monumental chore, especially these days when my little man makes things take twice as long...) We’ve stripped the house of it’s Christmassyness this morning and made best attempts to clean the majority of downstairs.  We’ve been so lucky with presents this year (so much so that we had to leave presents behind for them to follow on at a later date!), so the challenge has been where to store all of our new things.


10 Smart Soldiers
There have been so many lovely toys and gifts for my little man’s 1st birthday and Christmas  - people have been so generous.  My little man’s top 5 toy highlights this year have been: 1) Pop up tent and tunnel with 100 play balls – he has been crawling in/out of this non-stop (...and so have I...), 2) Wooden soldier skittles, 3) Garage (with cars, lift and ramps and all sorts of boy-like fun),  4) A box of balloons (seriously an amazing present), 5) Rocking horse (but it’s a beautiful cow..!).


I have been equally spoiled and I will share a few of my top presents... My new crafting hobby has now enabled easier gift selection for my Mummy Clause...


My first sewing box (and my gorgeous oil cloth)
Treasure box.


My stocking was filled with all sorts of sewing goodies such as owl needle holder, pig pin cushion, little scissors, polka dot fabric scissors etc so a treat to open them on Christmas morning.   I had a gorgeous first sewing box to bestow all of my goodies in, and a beautiful box full of ribbons.  My sister ( aderyn du )has made me a gorgeous box of treasures – stunning fat quarters in a variety of colours, she has gifted some of my favourite fabrics from her own collection, cute buttons and ribbons...AND...iron on “mylittleman” tags! Very cute!  She also tucked in a ball of yarn and crochet hook as I’m keen to learn the gobbledygook mayhem of crochet!  Lovely gifts that that will get my creative side going...but most importantly they look amazing too!

My sisters present to me!
Scrumptious Fat Quarters.
Other top non-craft presents were a sage/cream spot oilcloth from my man for my kitchen table, kitchen roman blinds made by my sister-in-law (yet to be installed so picture will follow in due course), a picture of my little man from a previous photo shoot.  I have been spoiled!

We have been given Christmas money to buy a new laptop, and we have been gifted a shiny external hard drive, so soon I will know that my pictures and important bits are safe, and will be able to blog from the new laptop (also pretty in peacock blue!).

Crumbs...we have been spoiled...more than we could ever ask or hope for.  Thank you everyone!


It would be wrong of me not to mention the gross relationship I have had with food over the past week...I have eaten all sorts of yumminess from turkey dinner, home cooked sausage rolls, sprouts with chorizo and chestnuts (you’ve always got to mention the sprouts...!), to puddings galore in the shape of chocolate log, frangipane (...or Frangygranny...) tarts, Christmas pud, mince pies....  Excessive on all counts...but it felt so right at the time! Granny has also enlightened my little man to his first experience of biscuits in bed....apparently it’s what Grannies do....!


Another Christmas gone...now a few days with my men to settle, contemplate and plan ready to see what 2013 has in store for us.

I hope you had a lovely Christmas...

Love from me and my little man x

Friday, 21 December 2012

More makes from my wee man!

Nursery have been busy with my little man. It's been so festive at the nursery with decorations everywhere.  They had a lovely Christmas dinner (my little man takes after his father...apparently he loved eating chocolate log!), and they turned their sensory room into a grotto where he was able to sit on Santa's lap and get a gift!  Fantastic! They've had party food and party games (my little man won pass the parcel!!!Whoop!)...but I think if you seen what they've been making these past few weeks I think you'll agree that they deserved a party to let their hair down!

Here goes...

 A 2013 Calendar!!!  Fantastic glittery footprints.  I have asked permission...I'm not sure if you know but I'm quite honest...and I think it's rubbish apart from the glittery footprints (of course!).  My man said you can't expect the nursery to have time to titivate these things!  I adore the simplicity of it and the thought behind it...but as we won't use it as a calendar I asked permission from the other (he would like to say better...) half to re-create any not so good makes so we can display them at home!  Permission granted! So I'm allowed to prettify my little mans makes...but that's only if they need it!...Look at my next beautiful gift he made us...this definitely doesn't need any prettifying!...


  A beautiful glittery snowflake decoration hanging proudly on our tree!  I love it!  All sparkly and twinkly! And the fact the sequins are heavy to the left makes it even more endearing! No titivating needed here...

Our Christmas card...he has spent a lot of time thinking about keeping in the lines and I think he's got the colours just right!


I think you'll agree...they're fantastic! I'm very proud of his efforts...and I'm glad he was able to let his hair down, party and chillax at the end of the nursery year!  Well done my little man!

Here is what I did to that calendar...I chopped out his feet...and pinned them on the wall...much better!  He's checking them out...I think he agrees they look nice up there! (..but that was moments before he chucked his bolognese on the floor...so either he didn't like my cooking or he's thinking "That is definitely not what I made!!!")

Merry Christmas!

Love from me and my little man x

Gifts for others.

Well this Christmas has all been a bit of an ambitious rush to get some things done...but I had two projects in mind and I have completed them!  I think next year I will hopefully be able to do a lot more making, and hopefully I will be a bit better by then!

Project 1:  Yo-Yo's first Christmas Bib.

The success of my little mans birthday bib spurred me on to make one for my nephew (Ioan) who is 8 weeks younger than my man.  This is his official first christmas (my little man officially was here last year!) and I thought it would be special to make something for him...and I know my sister would appreciate the work I put into it.  I followed the same method as making the birthday bib.  I had a design in mind - A christmas cracker exploding, with "Ioan's 1st Christmas" written in the explosion bit...I tried it...but I couldn't quite get it to look like I had it in my head! I think it was due to the definition around the cracker shape which wasn't clear enough...I got disheartened...and made the decision to ditch and start again! So my next idea was the one I stuck with...a cheery gingerbread man.  I thought keep it simple...who didn't tell me that felt letters are the fiddliest little blighters around! I had issues with my thread breaking all the time (I took my cousins advice to start mid fabric and not close to an edge and to leave long tails - both did help).  I couldn't ask my sister expert for help as it was a surprise! Grrrr!  I was so annoyed with it, but hey...it's turned out okay!


I can see all the niggly bits...and I have now learned that interface bonding stuff exists for future projects!  I think that would have been better with the lettering and then I could have embellished with hand stitching.

Well the next challenge was blinking Royal Mail!!! Okay...so I understand the Christmas delays..but first class taking almost a week!  We were both held in suspense...and then she got it...and it fits...and it will be worn Christmas day! (I have warned her it may not wash well but that I don't mind if it gets worn and ruined!)

She's already blogged about it here on her page... Aderyn Du


Project 2: A decoration for a dear friend 

My lovely friend Josephine had a baby boy this year (a lot of boys about!) and I thought this could be used as a First Bauble...but I'm a bit late posting! She's mid moving house so I hope they haven't got the internet connected yet!  I think she will appreciate a bit of home made making...I always tell her I'm doing a "josephine" which translates as pottering about being productive and creative! She's always making in the kitchen, has taken up knitting...and I think she's great! She makes me smile so I hope this makes her smile!

Seeing as the gingerbread man looked okay, I thought I'd go for a gingerbread man bauble! All handstitched, so another new challenge.

I cut out the two shapes and decorated - purple buttons with gold thread, smiley face, and icing for arms and legs.  I then embroided his name on the back.  I then had my first go at Blanket Stitch.  I used this tutorial from future girl which was very helpful and easy to understand - Future Girl  So I blanket stitched around him and stuffed him toward the end.  I remembered to put a nice hanging loop at the top.


I don't think he looks too shabby!  For next time I will use a different colour embroidery thread so that it's more easily read, and I think I'll reconsider so many letters (Christmas is a long word and it loses it's affect when you have to squish it in!).  The blanket stitch was good, but I kept running out of thread so it was a bit stop/start this time.  I also should have straight stitched the loop in...some reason I tried blanket stitching around it...but that was a bit silly of me!!  These learning points are a good record of what to improve next time!

What do you think...?!


 I think he'll look nice on a tree...!


More crafting next Christmas I feel...

Love from me and my little man x


Friday, 7 December 2012

Christmas Beginnings

CHRISTMAS!
One of my favourite times of year I think...when the decorations go up and your home begins to feel cosier as it gets dark outside and you can sit in the warm and sit mesmorised by the twinkling lights.  The tree has always been allowed up from the 1st of December...so without fail our tree was assembled!  It's not a real tree but it's a good fake one.  One year when my little man's old enough I'm sure we'll go off to one of these places where you pick and chop down your own tree...that sounds like an excellent family start to Christmas...the thought of my little, and my not so little, men cutting down the Christmas tree brings a smile to my face.

My little man checking out the tree...
My husband puts the tree together...and I do the decorating with his approval (or dissaproval) from the comfort of the sofa.  We always buy one new decoration every year to add to our tree so we've got a bit of an eclectic mix on our tree...but that's how we like it.  Then we can look back and think about the associations we can make with the decorations we have.
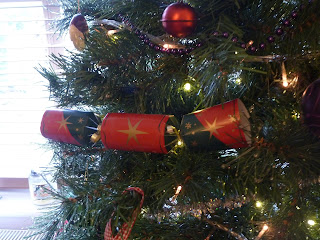
 The addition this year is very important....a Christmas Cracker.
First Christmas Bauble
Not just any cracker...this is the cracker from Southampton General Hospital as last year I was discharged home at 6pm Christmas Evening having had my little man the previous evening.  From memory the Christmas dinner in hospital was awful...although I think I was too excited and scared to think about food at the time.  I was dissapointed I didn't have a 1st Christmas Bauble, so we took the cracker which will always remind us of our little mans' first Christmas.


 Some exciting news in the house...Santa has written to my little man! He wrote a nice personalised poem and sent it by Rudolph express delivery!  I had my doubts...but I think this has reconfirmed the reality of Santa!

A letter from Santa!!!!

 Hope your Christmas sets off to a good start...! 


Love from me and my little man x

Wednesday, 5 December 2012

One-Eyed Monster...

It's been a bit stressful at work lately and I've been enjoying doing a little bit of crafting to take my mind off things. I saw a bib tutorial which I thought seemed easy enough to follow (please remember my skill level!) at sew funky.. (Have a look here - http://sew-funky.blogspot.co.uk/2008/02/tutorial-make-bib.html ) and thought I would give it a go!  I had my little man in mind as my model, and thought I would try and create a special bib for him to wear on his 1st Birthday.

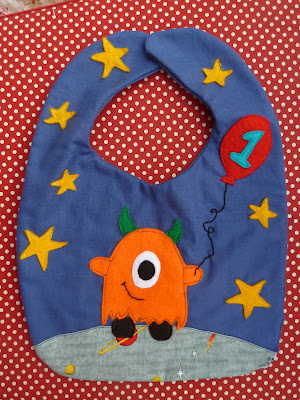
Design - I was thinking of a few things as my theme for a boys first birthday...dinosaurs, trains, teddy bears, robots etc.  and I finally decided on a monster/alien theme as I thought it would be a bit different and it felt imaginative and fun! (I also have a low range of fabric in my stock at the moment so have got to be aware not to make elaborate plans that will find me raiding the piggy bank again!)  I thought a friendly monster was the way forward, and I searched the net for some inspiration and found my monster, and then designed the bib around him.  Here's the drawn design...

So an alien/monster...standing on a planet surrounded by stars...and very importantly holding a number 1 balloon!  Off to work I set...


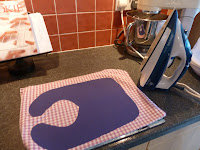
Creation - I did start doing a step-by-step record...but admittedly I forgot the photo's when I became engrossed with my creation.  I firstly drew a bib template...based on a previous bib that my little man used to wear and made it a bit bigger to allow me some room for prayer and swearing as I sewed!  I cut out a top layer, base layer, and a lining material for the middle layer.
After some ironing (I NEVER iron but this was quite pleasurable!) I set about cutting out my felt counterparts in order to assemble my friendly monster, planet, stars and balloon.  I pinned all pieces in place and then sewed to my hearts content. I decided to hem the planet and straight stitch as I've had a bit of difficulty getting my zig-zag stitch quite right.  I hand sewed the balloon string and his smile, and sewed a popper fastening instead of velcro.

Bib Template


Cutting out...I need sharper scissors...


The 3 layers...top, base and fleece middle layers.

Ironing out all the creases...how pleasing!


 Pinned in place for sewing.


  And here is the finished bib for my little man's FIRST birthday! I think he'll LOVE it...I know I do. 

Love from me and my little man x


The finished master piece!!!

Friday, 23 November 2012

Christmassy Cushion Cover

With my new found skills I thought I would put them into good use. We are distinctly lacking cushions on our lounge sofa.  It's one of these sofa's that is so deep you could use it more like a bed than a sofa. So cushions are the only way that one can get their feet touching the floor...and we have limited cushions for this! Lets learn how to make Cushion covers as a next project...surely simple-ish right...?! 

My sister talked me through a sealed cushion cover...literally cut out your square pattern leaving a small seam allowance, sew all the way around 3 and a bit sides, stuff the cushion in and handsew up the rest.  Easy!  I took a closer inspection of a cushion she had bought from Matalan...very shoddy sewing up - I could definitely do better (feel my confidence growing!)!

We thought an envelope cover would be best to try and master...as if I can do that it's a bit more complex so it would be a good test.

So I cut out my square pattern with seam allowance and appliqued a Christmas Pud (aiming for a funky festive cushion.) made from felt.  I handcut the shapes, and sewed on to the material. Not a bad pud...but definitely need practice on my machine skills!  Apparently mistakes and squiggly lines make it look home made and quirky! Maybe Shabby...but without the chic! 

 Next for the back. I chose a blue starry fabric for the back.  I made the bottom section longer so that when in place the top section would overlap like an envelope in the desired way. 

I made some binding from the material used on the front to tie it in.
 I pinned the cushion all together and then sewed around the whole cushion.  I then turned it right side around.  I think it looks funky and festive and I am really proud of it! I am using it right now to make my feet touch the floor!  My main learning point from this is to make sure the back sections are pinned in the correct way as I accidentally pinned the lower flap over the top flap when it should have been the other way around...I could have unpicked it all...but actually that's my learning mistake...I need to let go of some of my "everything needs to be perfect" traits!


 I love it!

Love from me and my little man x

Little Man's Makes

It's obviously not all about me.  My inspiration is my very own little man who is 11 months old tomorrow.  Born on the 24th of December I think Santa sprinkled a little magic dust on him as he's already churning out a few pieces of his own!

Check out his collection....

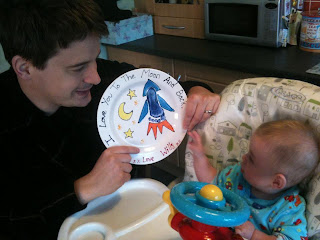
 This one was the very first...made for his daddy's First Fathers day.  We went to the paint your own pottery in Marlands Shopping Centre, Southampton and got messy!  I organised for my mummy friends from my NCT (national childbirth trust) group to join us so we could create havoc! So 7 mums and 7 babies...and paint! There were splodges, smudges, corrections by everyone but I think Wills creation turned out well...  He put a footprint on the bisque plate and then with a bit of imagination it turned into a rocket flying into space! The message was from the book "Guess How Much I Love You" which me and my husband loved when we were first going out.
The plate got fired and turned out well.  And his daddy did love it when it was unwrapped on fathers' day! Check out the pictures...


Daddy with his Fathers Day Plate


Plate proudly on the kitchen wall.


So next creation by my little man was his Christmas Plate for Santa's Treats on Christmas Eve!

Again another footprint (I wish I'd done it in darker green paint now!).  It was made in October on our holiday to Center Parks, Longleat.  My little man was very poorly on holiday, but he chippered up enough to get this done so I can't wait to put it out for Father Christmas...  Apparently Santa likes Beer and Chocolate Yule Log....hmmmm......


And lastly is a proper creation from my little man made in nursery.  He started nursery in October when I returned to work.  He appears to absolutely love it!  And I was very pleased when I was handed this spider that he made on Halloween! Very artistic! The spider did suffer an injury on the way to the car...he became an amputee...(but gosh...have you tried carrying a baby, bags, opening doors AND a funky spider plate...!) I hope to see many more pieces of art from my little man, ready to decorate the kitchen wall. 


Love from me and my little man x

Thursday, 22 November 2012

Stuffing a Letter to Stuffing a Stocking!

A weekend of great fun when me and my little man travelled to my sisters for a long weekend away.  After battling with the M6 full of traffic jams, with cheese sarnies strewn all over the car and a whiffy smell emanating from the rear passenger we were pleased to arrive to a mug of tea and the promise of a cookie!


My sister had a baby boy 8 weeks after my little man arrived, so we were looking forward to seeing the two boys play and entertain each other.  Our main plan was to entertain the kiddywinkles enough to wear them out for decent naps and bedtime to allow us time at the crafting table. Did our plan work? No... So we worked long into the nights and burnt our candles at both ends...but I think we achieved a great deal.  The housework was definitely not achieved...and the mess mounted higher and higher on the dining room table!  I'm not sure my brother-in-law really appreciated how messy creativity could be!

I planned to start simple so I could get over my machinists' nerves and pick my sisters brains for tutorials as needed! I have LITERALLY not sewn before...so all a bit of daunting, but exciting, experience!  I stuffed a heart back at home and messed around with an old pillow case to figure out stitches etc. and to have a play with my machine, but did nothing with intention.

My first project was to be a christmas tree/house decoration for my dearest friend.  So a decorative stuffed hanging letter was the plan.  It is an "L" if you hadn't guessed with some jingle bells to add a more festive feel.

I had initial difficulty getting my head around mirror imaging and cut out two shapes that didn't fit together! And then when i sewed the final two together, I was so excited I didn't match up the stripes...so vertical this side, and horizontal the other side. 

Oh well...my sister says it adds to the charm...

I think my friend will love it as my first ever make, and I think she'll appreciate the effort I put in.  I'll have to let you know what she thinks!


So start simple...and aim BIG! From stuffed letter to Christmas Stocking for my little man!  It's definitely his FIRST stocking...but not his first Christmas...he pipped Santa to the post on Christmas Eve so technically he has already had one Christmas.  Pity the majority of his first was spent in the General Hospital making it out for 6pm Christmas day!

So with a lot of coaching...I made it!...here it is...

A festive Robin singing a few hand-sewn notes to keep up the merry cheer.  I love the striped fabric on this side.  I made the robin out of felt.

My little man's name appliqued on this side so that Santa knows where to stash the goods!

The inside is lined in a gorgeous material patterned with gingerbread men, candy canes, hearts...lots of things christmassy...


I love the stocking and I am sure that it will be loved every 24th/25th December.  I am looking forward to filling it and leaving it by the bedroom door for my little man to stumble upon Christmas morning and open up the goodies in bed with wrapping paper strewn everywhere! (I may have to help him in these first few years...I'm not complaining..!)


I thought I better label it to tell him that I made it with love... I hope it lasts!

Right...now where's the coal and tangerines....?!?

Love from me and my little man x